Tacos and refried beans

Cooking from scratch

People used to always encourage me to make tacos – the kids love tacos – but I never did because people meant for me to buy canned refried beans and pre-made tortillas and that’s not cooking, it’s just assembling. But then I thought, I’ll try making my own refried beans and tortillas. And it turns out to be pretty easy, and much better than the store ones. And no, you don’t have to soak the beans.

How to make Tacos:

About an hour and a half before dinner (or the night before), put a half a cup of pinto beans (or black beans) in a gallon of water on to simmer in a saucepan. You’ll probably need to simmer for about an hour and a quarter, or until the beans are soft enough to cut in half with a fork.

When the beans are nearly done, preheat the oven to 425. Take a medium-size mixing bowl and mix 1 1/2 cups of masa flour with 1 cup of water and a pinch of salt. You should get a soft dough. Knead it a little in the bowl. Grease a cookie sheet with plenty of olive oil or safflower oil.

Scoop up golf-ball size balls of the dough and put them on the cookie sheet. Use the palm of your hand to mash the balls flat; they should be about 3-4 inches in diameter. If the dough sticks to your hand, oil your hand a little. Bake the tortillas in the oven until they are crisp and brown, about 20 minutes.

refried beans

Mashing the refried beans

While the tortillas are baking, chop an onion and saute the chopped onion in a frying pan. While the onion is frying, drain all the water from the cooked beans and pour them into the frying pan with the onion. Stir pretty often (this is the refrying part) so it doesn’t burn. Use a potato masher to mash it together as it fries. Add a pinch of salt and a pinch of pepper. Scoop it out into a bowl.

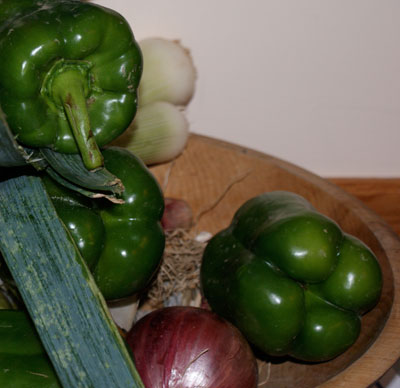
On the counter, line up your ingredients for assembly: a plate with the tortillas, then the bowl of refried beans, then a bowl of shredded lettuce, chopped tomatoes and/or bell peppers, a bowl of Greek yogurt, a bowl of tomato salsa (or make salsa by mixing tomato sauce and spices), and a bowl of grated Cheddar cheese.

Vegetarian or vegan?

Naturally vegan if you leave off the yogurt and cheese. You can make it a meat dish by adding some chicken or hamburger. Or add crumbled, fried seitan to be like hamburger but vegan. Do the meat on a cookie sheet in the oven while you’re cooking the rest.

And will tacos keep?

The refried beans will keep for a few days, but the rest is better fresh.

Sushi

Why make your own sushi?

It’s much cheaper than going out for sushi, it’s a quick easy dinner you can make after you get home from work, most people like it, and it’s a great way to use up leftover veggies in the fridge.

How to make sushi:

Start by making rice. You should use short-grain rice, but regular long-grain rice also works fine. Use a cup of rice to 2 cups of water or miso broth. Bring the rice to a boil in a small covered saucepan, then turn the heat to low and simmer until the water is absorbed and the rice is soft. Add a glug of rice vinegar, stir, and let the rice sit and absorb the flavor.

While the rice is cooking, place a sheet of nori on a napkin or clean dishcloth, with the short side towards you and the shiny side down. Put a bowl of water near the nori. Chop vegetables, meat, and/or fish into thin strips and leave them on a plate or cutting board near the nori.

Some good choices for fish are crabmeat, squid, shrimp, sardines, trout, salmon, tuna (canned is ok). For meat, maybe thin sliced pork or chicken. You can also put strips of egg omelette.

For vegetables, avocado, cucumber, radish, cooked asparagus, thinly sliced or grated carrots, red/orange/green peppers, peapods, green onions, mango, fried salmon skin, mushrooms, bok choy or cabbage, lettuce, fried eggplant, fried tofu, zucchini. Use whatever you have in the house.

When the rice is done, add a few drops of white vinegar and a large pinch of salt, and stir. Use a soup spoon or a spatula to spread the rice evenly about 1/4 inch thick all over the nori, leaving about 1/4 of the sheet uncovered at the top to seal the roll with. Make sure to get all the way to the edges.

Now at the side nearest you, put some of your fillings on top of the rice. Lay them out so they go all the way to the edges too. Your fillings should make a pile about 1/4 to 1/2 inch in diameter.

Place your fingertips on top of the filling and use your thumbs to lift up the bottom of the nori. Roll away from yourself gently, until you reach the part with no rice. Dip the fingers of one hand in the bowl of water and dampen the nori (you can also dampen the side you’re going to want it to stick to) and then continue rolling until it is all rolled up. Leave the seam on the bottom to keep it together.

Let the roll sit for a minute to solidify, then gently lift it on to a cutting board, and slice it. Six slices is traditional, but do whatever you want. Use a sharp knife, don’t press down much (as if you were slicing tomatoes), and make sure to cut all the way through the nori at the bottom. Arrange on a plate lying down so you can see the fillings, and serve. You can sprinkle your sushi with sesame seeds if you like.

Vegetarian or vegan?

Naturally vegan unless you put fish or meat in, and delicious with soy sauce, pickled ginger, and wasabi.

How to keep corn chips

Sushi is better the same day, but you could also eat the leftovers cold for lunch the next day, or even the next several days if it’s vegan sushi.

Stuffed peppers

Easy to serve at parties

These stuffed peppers take a while to make, but you can make them the day before and then just heat them in a low oven (at about 250) for the party, and set them out on trays. Then they are easy for your guests to serve themselves, and it doesn’t matter if they’re lukewarm. The recipe is for a family, though, so you’ll have to double or triple it for a party.

How to make Stuffed Peppers:

(this takes about two and a half hours to make and bake, so allow enough time).

Preheat oven to 400 F. Begin by cooking two cups of rice with four cups of water in a large saucepan. Use high heat until the water boils, then simmer over low heat until the rice has absorbed all the water, then turn off the heat. Meanwhile, cut four green bell peppers in half across the middle so that the stem is all on one half and the bottom all on the other half. Remove the seeds and put them in the compost.

Arrange the pepper halves cut side up side by side in a 9×13 roasting pan or a casserole. In a frying pan, add a little olive oil and saute one chopped onion with two cloves of garlic until they’re soft.

Go back to the big saucepan with the cooked rice. Add the onion and garlic, 1/4 cup of olive oil, a can (6 ounces) of tomato paste, a handful of chopped fresh mint, any other greens you want, a teaspoon of salt, and 1/2 teaspoon of pepper. Mix, and then squish this filling into the pepper shells. It’s okay if they’re heaped pretty high. Pour the juice of one lemon over the top.

Put the roasting pan in the oven, and then pour a cup of water into the pan around the pepper shells. Put a baking sheet on top of the roasting pan to keep the stuffed peppers from drying out. Bake for 1 1/2 hours.

As soon as the peppers are out of the oven, make an avogolemeno sauce to go with it. Serve the stuffed peppers with the sauce, and with a big tomato-and-cucumber salad.

Vegetarian or vegan?

Naturally vegan, unless you use the avgolomeno sauce. If you want a vegan sauce, you could just use plain lemon juice, or mix tahini with lemon juice, water, and salt. If you’d rather this had meat in it, mix 1/2 pound of ground lamb with the filling.

And will stuffed peppers keep?

Yes, stuffed peppers are actually better the next day when the flavors have had a chance to blend. You can microwave them to heat them up, or heat them in a low oven (about 250). They don’t freeze well though.

Stuffed zucchini

Got too much zucchini?

If you’re a better gardener than I am, there may come a point in July or August where you have more zucchini than you know what to do with.

This is a delicious way to use up a lot of zucchini. And it makes a great main dish for company. You can have it ready to go, and put it in the oven when the guests arrive. And you’ll then have plenty of time for a drink and some appetizers (maybe baba ganoush and crackers) before the stuffed zucchini are ready to eat.

How to make Stuffed Zucchini:

(this takes about two and a half hours to make and bake, so allow enough time).

Preheat oven to 400 F. Begin by cooking 1/2 cup of rice with a cup of water in a small saucepan. Use high heat until the water boils, then simmer over low heat until the rice has absorbed all the water. It won’t take long.

Meanwhile, cut off both ends of ten medium-sized zucchini. Slice the zucchini in half lengthwise. Use a knife to make two long cuts in a V so that you remove the center seeds of each zucchini half. Put the insides of the zucchini in a medium-sized mixing bowl. Put the zucchini boats side by side in a 9×13 roasting pan or a casserole.

Mash the zucchini insides in the bowl, and add 1 chopped onion, the cooked rice, 1/4 cup of olive oil, a can (6 ounces) of tomato paste, a handful of chopped fresh mint, a teaspoon of salt, and 1/2 teaspoon of pepper.

Mix, and then squish this filling into the zucchini boats. It’s okay if they’re heaped pretty high. Pour the juice of one lemon over the top.

Put the roasting pan in the oven, and then pour a cup of water into the pan around the zucchini boats. Put a baking sheet on top of the roasting pan to keep the stuffed zucchini from drying out. Bake for 1 1/2 hours.

As soon as the zucchini are out of the oven, make an avogolemeno sauce to go with it. Serve the stuffed zucchini with the sauce, and with a big tomato-and-cucumber salad.

Vegetarian or vegan?

Naturally vegan, unless you use the avgolomeno sauce. If you want a vegan sauce, you could just use plain lemon juice, or mix tahini with lemon juice, water, and salt. If you’d rather this had meat in it, mix 1/2 pound of ground lamb with the filling.

And will stuffed zucchini keep?

Yes, stuffed zucchini are actually better the next day when the flavors have had a chance to blend. You can microwave them to heat them up. They doesn’t freeze well though.

Stuffed eggplant

An Italian recipe

An Italian friend of mine, who is a fabulous cook, was kind enough to give me this recipe. Or at least, this is how I wrote it down – it’s probably not exactly like his anymore. A lot of people think they don’t like eggplant, but try this. It’s basically twice baked potatoes but with eggplant.

How to make stuffed eggplant:

Preheat the oven to 350 F. Take a large eggplant and cut it in half the long way. Pour a little olive oil on a baking sheet and place the eggplant halves cut side down. Roast the eggplant for about 25 minutes. Meanwhile, chop an onion.

When the eggplant is roasted, let it cool a little and then scoop out the insides (leaving enough so the sides won’t cave in) and put them in a medium-size mixing bowl. Mash the eggplant in the bowl. Add the chopped onion, a cup of breadcrumbs, a cup of ricotta cheese, a large pinch of kosher salt and a teaspoon of pepper.

(To make ricotta at home, heat a quart of milk in a saucepan, and when it’s warm add a couple of tablespoons of white vinegar or lemon juice to curdle it. Then strain out the whey through a cheesecloth.)

Mix, and then add four eggs, and mix again. Put the mixture back into the eggplant shells and bake at 350 F for half an hour. Serve warm, with a green salad and sliced tomatoes.

Vegetarian or vegan?

Vegetarian. You can make stuffed eggplant vegan by using tofu in place of the ricotta cheese.

And will stuffed eggplant keep?

Yes, it will be fine the next day, if you keep it in a tupperware in the refrigerator.

Stuffed cabbage

Grandma’s Scientific Recipe

You might think my grandma’s recipe for stuffed cabbage was probably ancient, handed down from her grandmother’s grandmother. Cabbage, right? It’s been around forever?

Well, yes, but surely rice and tomatoes and green peppers weren’t actually so common in medieval Lithuania? And actually her recipe called for canned tomato paste, which wasn’t even invented until the late 1800s.

But the least ancestral part of this recipe has got to be sour salt. Sour salt is not salt at all, but pure citric acid, which began to be sold in stores about 1920.

So probably this recipe was a very up-to-date one when my grandmother’s mother began using it, and she got it from her mother. It’s old, but not thousands of years old – not even a hundred years old.

Cabbage rolls, though, do go back to the middle ages in Eastern Europe, and by the early 1800s a lot of people in Eastern Europe did use tomato sauce to make savory (not sweet) cabbage rolls like these.

So it’s likely that my great-grandmother was only updating an older recipe that her own great-grandmother might have used.

How to make stuffed cabbage:

In a medium-sized mixing bowl, mix one cup of raw rice, one cup of chopped meat (that’s what my grandma called it; she used hamburger, but I usually use ground lamb), one chopped green pepper, one chopped onion, and a large pinch of salt. Use your hands to mix it well, then wash your hands with soap.

You can order this sour
salt from Amazon

Put a whole large green cabbage head in a large stewpot in your sink. Boil water in the kettle and pour it over the cabbage to soften it a little. Use a sharp knife to cut out the hard core. Pull off the loose green outer leaves and throw them away.

In a heavy, oven-proof casserole, saute another chopped onion in 1/8 cup of olive oil.

Preheat the oven to 300 F. Peel off the next layer of leaves very gently, one at a time. Lay the leaf on the counter so that it curves up towards you, and put a handful of the stuffing in it. Roll this up and tuck in the ends, and put it with the open side down in the bottom of the casserole, on top of the onions.

Repeat with more leaves until either you run out of filling or you can’t get the leaves off in one piece anymore. Stack the stuffed cabbage leaves in layers in the casserole. Between and over the layers, pour a mixture of one cup of water, one can of tomato paste, and 1/4 teaspoon of sour salt (available on Amazon, or use the juice of half a lemon). (Or if you have homemade tomato sauce, you could use that instead).

The liquid should come at least half-way up the sides of the casserole. Cover the pot and bake for about two hours.

Need a faster version?

Try this unstuffed cabbage: same ingredients, but no stuffing, and you can make the whole thing in under half an hour.

Vegetarian or vegan

In its natural form, my grandma’s stuffed cabbage had a certain amount of meat in it, though it was always largely vegetables. You can leave out the meat, if you want, and add an extra 1/4 cup of olive oil and a can of black beans instead. Then your stuffed cabbage will be vegan.

Can I keep this for later?

Sure. Stuffed cabbage is delicious for about a week after you make it – the flavors will blend over time. Keep it in a sealed tupperware so it doesn’t dry out, and heat it up in the microwave.

Greek string bean stew

Our Greek cook Vasiliki

During summers years ago when we were excavating a Roman town (with a Stone Age village underneath it!) in Central Greece, we hired a cook whose main qualification was that she was used to cooking at home for a large family. Vasiliki was worried about cooking for Americans, because she didn’t know fancy restaurant cooking, but we told her to just make what she made for her kids at home. That turned out to be fantastic: stuffed zucchini, zucchini scrambled eggs, this string bean stew, and many similar recipes.

In the end, Vasiliki’s only disadvantage was that she didn’t know how to read or write, which meant it was difficult to get written receipts to show the National Science Foundation to show that we had spent our grant money on tomatoes, green beans, and zucchini.

I serve this stew as a main course, with a tomato salad and chopped basil on the side.

Greek string bean stew

How to make Greek string bean stew:

First get your ingredients ready, or you’ll be in too much of a rush (I never do this, and then I’m always sorry when I have to hurry and the onions are burning). Chop an onion, scrub six big potatoes and cut them into bite-size pieces (you don’t have to peel them), and break both ends off of two large handfuls of string beans. The proportions don’t really matter that much; you can put in more string beans if you want.

Now heat about 1/4 cup of olive oil in a deep frying pan over medium heat, and add the chopped onion and a couple of cloves of crushed garlic, and stir with a wooden spoon.

When the onion begins to brown around the edges, add the potatoes and the green beans. Mix half a can of tomato paste with two cups of water, and pour it over the top so the vegetables are about halfway in the water. Or, use fresh tomato sauce, if you’ve been making tomato sauce – about two cups.

Cover and let it simmer for half an hour. When the potatoes and beans are soft, even mushy, mix it with salt and pepper to taste. If you want it to taste more Greek, also add 1 teaspoon of oregano and 1/2 teaspoon of cinnamon.

Vegetarian or vegan?

Naturally vegan. You can make it not-vegetarian by adding a can of tuna or some canned anchovies if you like.

And will it keep?

Yes, like most stews this green bean stew is actually better the next day when the flavors have had a chance to blend. You can microwave it to heat it up. It doesn’t freeze well though.

Steak with pepper sauce

Do you mean that spicy southern sauce?

Nope. This is a French sauce – sauce au poivre – made with black pepper, and it’s not really spicy at all, just a rich, thick sauce that is good (and quick!) on noodles on a cold day.

How to make steak with pepper sauce:

In a large saucepan, put water on for noodles. In a medium frying pan, melt some bacon fat (or butter). Dice an onion very fine and fry it in the fat, along with a diced carrot.

When the onion is softened and just beginning to brown, add two cups of water, a cube of beef bouillon, a tablespoon of tomato paste, a half a cup of red wine, a handful of thyme, a large pinch of salt, and about a teaspoon of freshly ground peppercorns.

Chop and add a tomato. (I used a bunch of cherry tomatoes actually.) Stir and simmer over fairly high heat to reduce and thicken the sauce.

Meanwhile, cook fettucine or butterfly noodles. When the sauce is thickened, add thinly sliced raw steak in bite-size pieces, and simmer them in the sauce until they are just barely cooked (a couple of minutes).

Add more black pepper to taste. Serve over the noodles, with sauteed zucchini or a salad on the side.

Vegetarian or vegan

You could make this sauce vegetarian by using butter and vegetable bouillon, and substituting seitan for the steak, but I don’t think it would be great. If you’re not vegetarian, though, this would be good with seitan instead of the steak. Gluten-free, if you use gluten-free noodles.

Can I keep this sauce for later?

Mix whatever is left with the leftover noodles, and it will be fine reheated for a few days. It won’t freeze well though.

Squash with fennel

A more sophisticated taste for squash

Most squash recipes end up being pretty sweet, close to pumpkin pie. This is a more savory recipe, and it’s also gluten-free and vegan. It looks dramatic on a platter, and can take the place of a roast for a vegan holiday dinner.

How to make squash with fennel:

Preheat oven to 400 F. Cut a butternut squash or an acorn squash into slices and scoop out the seeds; put the slices on a baking sheet in the oven to bake for an hour. Go work on side dishes. If you’re making this for vegans, dice some firm tofu, dredge it in cornstarch, and saute in oil until crispy.

When the squash is soft and a little caramelized (browned), take it out and let it cool. Meanwhile, make the fennel sauce. Grind a handful of fennel seeds in a mortar until they are crushed and releasing their licorice-like smell. Chop a handful of raisins and mix them with the fennel in a bowl. Add a large pinch each of salt and pepper, a handful of coriander, a handful of chopped parsley, cilantro, or both, a handful of chopped nuts (pistachios or hazelnuts), and 1/4 cup of lemon juice, or lime juice, or wine vinegar, and 1/4 cup of olive oil. Mix and spread over the cooked squash. If you want it vegan, scatter the crispy tofu on top; if not, crumble feta cheese over the top.

If you’re not serving this to vegetarians, it also makes a great side dish with a little grilled pork sausage.

Vegetarian or Vegan?

These make a great gluten-free, vegan main course with a salad on the side.

What can I do with leftover squash with fennel?

This is terrific heated up in the microwave, for about a week.

Squash soup

Out of fashion?

A few years ago, I was reading restaurant reviews in the New York Times, and the reviewer criticized some restaurant for serving butternut squash soup made with squash and cream. The reviewer thought this was hopelessly behind the times, but I’d never had it.

There wasn’t a recipe, of course, but I experimented and came up with this recipe, which everyone likes even if it isn’t the cutting edge of New York fashion.

How to make squash soup:

Turn the oven on to 400 F. Cut a large butternut squash in half lengthwise, throw away the seeds and put the squash in the oven; leave it for an hour. Take it out and let it cool if you have time; that will make handling it easier.

Scoop out the orange insides into a large mixing bowl and throw away the tan-colored peel. Add a cup of whole fat Greek yogurt and a cup of whole milk, and use the immersion blender, or a regular blender working in small batches, to puree the soup. It’s nice to try to get most of the lumps out.

Add a cup of applesauce. Season the soup with salt, pepper, cumin, red pepper flakes, and cardamom to taste. Or use nutmeg, cumin, and cinnamon for a different flavor profile.

Vegetarian or vegan

Squash soup is vegetarian, but it’s not vegan.